Showing posts with label Hale Aloha Homeschool: Living and Learning in Paradise. Show all posts

Friday, November 11, 2011

Keeping a Homechool Grade Book


For me, the two most time consuming aspects of homeschooling are preparation and gradekeeping.  For younger students it is a little easier to keep track of grades but Middle and High School start to get complicated.

I've recently started using the free version of  Jupiter grades which has been a huge help in keeping track of everything and making sure there are no mistakes.  Jupiter used to be called Snap Grades and is used widely by public and private schools.  It is very secure and is completely online based. You can set up weighted grades and print report cards directly from the site.   Here are some pointers about setting up a gradebook with Jupiter.

1.  The first thing you need to do is set up an account on Jupiter Grades.

2. Next, you will set up a seperate class for each student.  There will obviously only be one student per class unless you have twins or children who are in the same class.  I named all of my clases with the grade first and the name of the class second.  For instance, 9th Physics.  That way, I can easily see which class goes with each student.  So, at the top of my page I have 14 classes showing because each student has 7 classes.

3. Next, go to to Set Up> Grading Options and set up your grading periods, grade scale and how all of the grades should be weighted.  For example, Tests 50%, Quizzes 25% and Reports 25%.  You will probably have a different set up for each class.  Some classes might have a participation or assignment grade (daily work).


4  You might want to set up a time every week or two to log grades into Jupiter Grades so you aren't left during the last week of the grading period scurrying around trying to get it all done.  I have my kids record their grades every day in every subject next to their assignments for that day so all of the grades are in one place for each child.

5. To print Grades, go to Print > Report Cards.  You can choose to print just that quarter or the whole semester, or the whole year.  You can also decide whether you want number grades to show or just letter grades.  For high school, it would be better to have number grades listed with letter grades.  You can also have it calculate a GPA.

6. Watch the tutorials for other tips.

How do you keep grades for your home schooled students?  I'd love to hear your ideas.

Tuesday, November 8, 2011

How to Make the Mother of All Homeschool History Timelines


The New and Improved MOAHHT Timeline is 37.3 feet long.


            We are in our third year studying World History.  Two years ago we started with creation, traipsed through Ancient Mesopotamia, Assyria, Greece and Rome.  The next year we moved on to the Middle Ages, Renaissance and Reformation.  And now we have finally landed at the age of Revolutions, Enlightenment, World Wars and Post Modernism.  I have to admit that I have never had so much fun learning about history.  Everyone says that you learn exponentially more when you have to teach a subject and that is definitely true.  I’m pretty sure I was paying about as much attention as anyone else in high school and college when I took world history but somehow I had some gaping holes in my over-all big picture.  I’ve been gradually patching those up as I prepare for our history lessons.  There is nothing like taking your time and really getting into it to help put everything into perspective. 

            When I started homeschooling, I read that lots of home school families make a history timeline and add to it over the years.  I thought that it was a brilliant idea and decided to make my own.  We happened to have a huge cardboard box left over from something so I cut it up  and made a 22 foot long timeline which we have been using faithfully to record the Trojan war, Francis Bacon, the Roman Empire, Bach et. all.    I can’t tell you how helpful it has been to have a visual reminder of when things happened to help keep it straight in my mind.  I know the kids are enjoying it too.  They’re making lots of connections and having those “Aha!” moments that are so exciting when you home school. When you see that 2012 is 20 feet away from Ancient Egypt you get an idea of how long people have been around- and how short American History is compared to World History.  

The other day I looked at our timeline and started thinking that although it was loved- a la Linus blanket,  it was really a bit junior varsity.  It’s made of plain old brown cardboard and every two weeks we  fold it  up and stick in the closet.  It's looking a big raggedy.     Plus, I am a selectively organized person (only a few choice areas of my life are organized) and it was bugging me that the timeline was hard to read and not categorized. Charles Wesley, The Rococo Period in Art and The Seven Years war were all in there together.    
Humble and Jumbled.
Ye Olde Timeline coming in at 22 feet.

Of course, I could buy a timeline ready to go off the internet but that would just be too easy.  I really wanted it to correspond with what we are learning.   Plus, I wanted to have the visual impact of seeing how far away those ancient dates really are and I didn't want to have to squint too much.    

So, I did what I tend to do and set out to improve the timeline.  Everything can be improved.  :) What I’ve got now is the Mother of All History Timelines and although still probably not considered pro, I think it is at least more varsity than my old one.  Certainly more organized and easy to read.  I have found it very helpful to be able to look at one thread of Science history and another one of Music and Art, Religion, etc. We are already having blast adding stuff to it.  It is 37 feet long and made of 16 pieces of poster board.  I know, where in the world do we keep it?  Well, we’re pulling it out when we work on it every couple of weeks and I keep it in a  cardboard folder that easily hides behind one of our doors.  This was actually the packaging I bought the poster board in.

Storing the timeline- notice the gecko (school mascot).


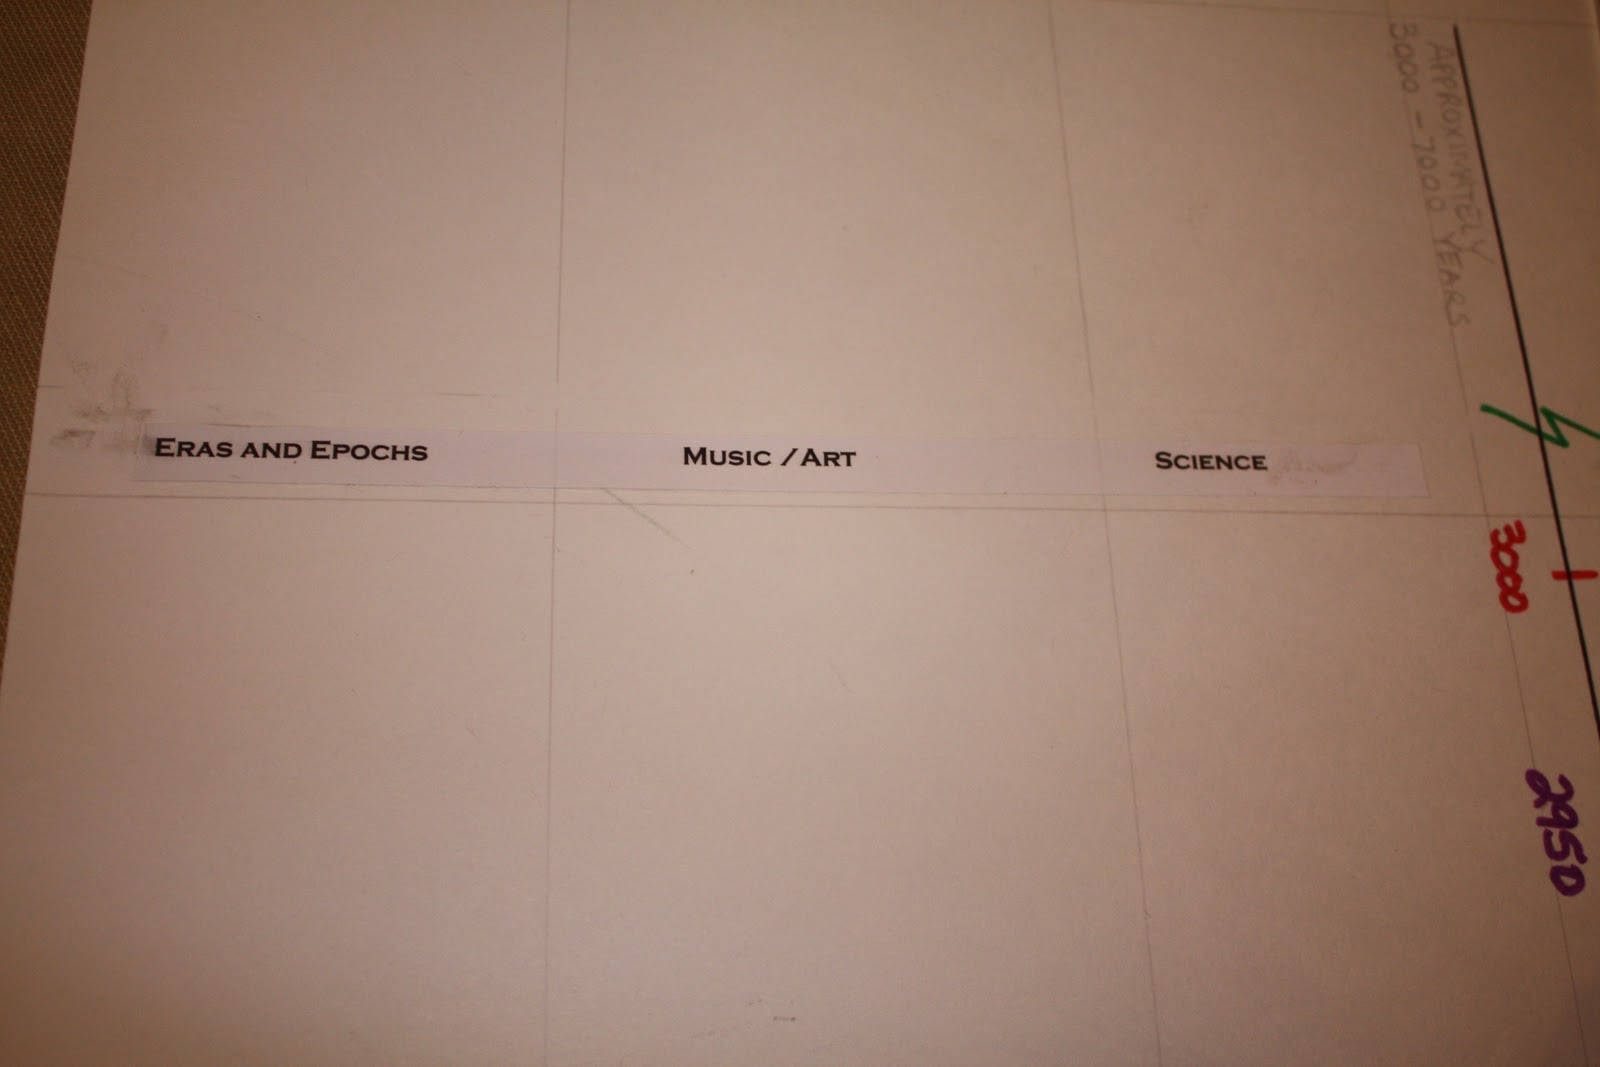
I’ve separated each sheet into 6 sections: Religion and Philosophy, Literature/ Theater, History and Politics, Science, Music and Art, Eras and Epochs.  Not all of the sheets have the same increments of time but it gives a general idea.  If you gave even weight to all the dates you'd have a timeline that wraps around the block.  


So, how can you make one of these nifty timelines for your very own?  It’s your lucky day!  You don’t have to reinvent the wheel.  I just happen to have written down the instructions.
 
5,000 years of World History in 37.3 feet

You will need:
16 sheets of poster board 22”x 28”
A pencil
A yardstick
Markers: black, blue, red, purple


This is a bit time consuming but you can take a few days and work on it or have your kids help you. 

1. On each sheet: Number in the right hand corner 1-16.
2.  On 15 sheets: Draw a horizontal line (divide the sheet in half) with black marker at 11” to form the timeline.  Then divide those halves into thirds by drawing horizontal lines with pencil at 3 ½” , 7 ½ “, 15” and 18 1/2”.   This isn’t exactly even but it is easy to measure and it’s close enough for me.  You will have 6 sections.
Dividing your sheets into 6 sections.


3.     Here’s an overview of what you will be doing:  These will be the headings for your sheets.  You can either hand write them or type them up and print them.  Cut them out and glue them to the tops of the sheets  in order ( See picture). 

a.     Sheet #1 AD 3000-AD 2500 (500 years) 2 ½”=50 years
b.      Sheet #2 AD 2500-AD 1800 (500 years) 2 ½”=50 years
c.       Sheet #3 AD 1100-AD 400 (500 years) 2 ½”=50 years
d.      Sheet #4 AD 400- 300 BC (700 years) 1”= 25 years
e.      Sheet #5 300 BC-1000 BC (700 years) 1”= 25 years
f.       Sheet #6 1000 BC -1300 BC (300 years) 2 3/8 “= 25 years
g.      Sheet #7 1300’s (100 years) 1”= 25 years
h.      Sheet #8 1400’s(100 years) 1”= 25 years
i.        Sheet #9 1500’s (100 years) 1”= 25 years
j.        Sheet #10 1600’s(100 years) 1”= 25 years
k.      Sheet #11 1700’s(100 years) 1”= 25 years
l.        Sheet #12 1800-1850 (50 years) 2 ¾”= 5 years
m.    Sheet #13 1850-1900 (50 years) 2 ¾”= 5 years
n.      Sheet #14 1900-1950 (50 years) 2 ¾”= 5 years
o.      Sheet #15 1950-2020 (70 years) 2”= 5 years

Add Titles to Your Sheets

3.   For all sheets:
a.     Mark 100’s in red.
b.     Mark 50’s in purple.
c.      Mark 10’s in blue.
d.     Mark 5’s in black.

4.  On the sheet you have left over (this is sheet #1) draw a vertical line at 7" to start recording history around 3000 BC.  I put a little jagged green line to note the fact that there’s some undetermined amount of time between when we start recording history with Adam and Eve and the year 3000.  At 7 ½” mark the year 3,000 in red marker (you might want to do all of this in pencil first and then go back over with a marker in case you make mistakes.) Then mark every 2 ½ inches.  (2 ½ “=50 years on this sheet.) Remember to count “backwards” since you are working in BC.

Sheet #1 is a little different.


6.  Make your Categories.  Copy these into a Word Document, use a bold font that is about 1/4 of and inch tall.  Make 16 copies of this list.  Cut them out and paste them onto each sheet (on the left hand side) in this order:  

Religion and Philosophy 
Literature and Theater 
History and Politics 
Science 
Music and Art 
Eras and Epochs
From Sheet #1


7.  Now you are ready to mark each sheet in pencil according to the measurements in # 3.  Put the dates below the lines (in pencil) making them about 1/4 of an inch tall.  Each sheet starts with the same number with which the last left off.  Go back over the numbers in marker following the color scheme in #4. Remember that on Sheet #5 which is AD 400-300 BC you will reverse the direction you are counting.  (See picture).  You can make a year 0 even though there is no such thing- or you can put
AD 1 and 1 BC on the same line.  There are actually 9 years between AD 5 and 5 BC.

Sheet #5 The birth of Jesus.


Start where the last sheet left off.
The 1700's

8.  Now, for the fun part.  Decide what you want to put on your timeline.  Just start wherever you are in your studies at the moment and don't worry about filling in the rest of the stuff.  This is a timeline you can work on for years.  

Make a list of all of the people, events and eras you want on the timeline for each chapter of your book.  Start a powerpoint file and add each of these items on your list to the presentation.  Then find pictures to go with the captions.  The pictures and captions should be small- maybe 1" wide by 1 1/2 " high.  You could add text to a document and have your kids search for appropriate pictures.
Be sure to include the date on each picture so you will now where to put it on the timeline.  For people, we usually try to pinpoint a special event in their lives like when they wrote a certain piece of literature or when they invented something and pin them to their claim to fame.  For other people who have too many claims to count, we just  pin them to the time period in their life when we feel they were most influential.  This is usually toward the second half of their life.   You are the boss of your timeline. 

9.  The Eras and Epochs section is used for any long period of time you would like to note during history that doesn't fit into your other categories or that would make things messier if you added it to a certain category.  For instance, there are many artists and musicians you could add to the mid 1700's so that section will probably be filled with pictures.  Use Eras and Epochs at the bottom of your sheet to denote the Baroque period in art and music.
Adding Eras and Epocs


10.  Don't forget to add yourself!  Add everyone in your family and other important ancestors or family events.


11.  Have fun and let me know how your timeline works out!


Friday, September 30, 2011

Technology in the Homeschool: Gettin’ Your Wiki On


                 I spend a good deal of time gleaning the internet for information and resources to enhance our home school.  In my first year of homeschooling, I would find a website that looked promising and I’d write it down on a piece of paper so I could come back to it later if I ever needed it.  Sometimes I’d bookmark it.  Or put  a sticky on my computer.  This system started to deteriorate rapidly as my bookmark bar became overloaded and I could never find that piece of paper with the link to the really cool animation of mitosis.  I needed a solution to help me organize the cool and useful stuff I was finding.  That’s when I learned about wikis. 
             

              If you’re like me the first thing that pops into your head when you hear “wiki” is “not a credible source for research papers.”  Actually, that’s Wikipedia, which is one of about a gazillion wikis out there.   According to Wikipedia (I know, I know), a wiki is a website that allows the creation and editing of any number of interlinked web pages via a web browser using a simplified markup language or a WYSIWIG text editor…etc…  Whatever that is.  Don’t let the HTML talk scare you, it’s easier than it sounds. It’s just a great big organization tool to help you rein in the information dragon.   I attended a full day seminar teaching home schooling parents how to utilize a Wiki in the classroom and it has revolutionized the way we organize and manage the power of the internet for school. 

               The internet fosters collaboration and the sharing of knowledge.  As a result, incredible amounts (I think the technical term is “scads”) of information and data are added to the collective intelligence each day.  For those of us who are still trying to figure out how to play 10 simultaneous games of Words With Friends this can feel very overwhelming.  Suddenly, we not only have to tend to vast amount of laundry, lesson plans and healthful meals (and WWF) but we also have to somehow conquer and harness the internet and bring it under our dominion.  A place for everything and everything in its place.    This can be a fast and steep learning curve.   Sometimes it’s tempting to just pretend it’s not there.  Like that pile of papers we’ve been meaning to go through. 

               I remember when I was in high school one of my classmates at our private school showed up in the parking lot with a new car- that had a phone in it!  A no-kidding full-sized bat phone.  We were all amazed.  This was 1989 and we all thought it was ridiculously decadent and “out there”.  Who in the world talks on the phone while they are driving?  Who would they talk to anyway?  No one has phones in their car. You can always stop at a pay phone if you need to call someone.  Or just wait till you get home, for goodness sake!  Little did we know…20 years later we would be wondering what we did before we carried phones with us everywhere we went.  Technology makes it easy for people to stay connected  in ways we might not have thought possible.  Same with the Internet.  Technology is making it easy to get information.  The problem is what to do with it once you’ve got it.  That’s where it starts to feel daunting.  A wiki can help you organize information, media, resources, discussion threads, lists and collaborate with others.  It’s very versatile.

           Let me give you a more concrete example of one way you could use a wiki.  This year my son is taking Apologia Physics.  I have set up a page on the wiki called Apologia Physics 2011-2012.  Off of that page I have all of the book chapters listed and each one links to a separate page.  So for instance, I have “Chapter 4 Motion in Two Dimensions”.  On this page I have links to the lectures for Chapter 4 from an open source online Apologia Physics Class.  So there is a link for “Lecture 1- Navigation in two dimensions” and “Lecture 2- Range Equation”.  I’ve also linked to several Khan Academy lectures and physics sites in case he needs extra clarification.

            You can do this for any course.  Last year, I took the Apologia Exploring Creation with Physical Science curriculum and found links to videos and extra resources for many of the concepts in the chapters.   So for instance, one whole page was dedicated to Chapter 3 and on that page there were links to extra material for the kids to watch.  Yes, it took some time to search and gather information to put on the wiki but it helps to have it all in one place.  Plus, you can use the information year after year because it’s always right where you left it- on the wiki.

            I could walk you through all of the steps to setting up your wiki but someone has already beat me to it.  Thank goodness.  No sense in reinventing the wheel.  Here’s a tutorial called How to Build an Educational Wiki to get you started.  

            Not many things in life are free- but your wiki can be! Sign up for an account at WikiSpaces for Educators to get your free wiki.   Be sure you make it private unless you want to have it viewable and editable by everyone.

             One thing I will mention is to pay attention to whether you are linking to an internal page or an external page.  If you find a web page or video on You Tube you want to link to your wiki you should have it open in a separate external web page opened in a new window (click the box for new window) so it isn’t stored on your wiki.  Likewise, all private pages should be linked internally. 


              I am not terribly techie so if I can do it, you can probably do it even better.  If you are just getting started here’s how I suggest you organize your (very basic) wiki:


1. Click the Edit Navigation link and delete the blue Page List widget. Now you will be able to edit the navigation bar just like you would edit a wiki page to add links and explanatory text.

If you need assistance editing a page you can watch the very helpful Wikispaces video tours.  In fact, you should probably watch it right now before your proceed. All of the “Getting Started” video tutorials are great.  I’ve also had good success with their customer service when I needed to find out the answer to a question I couldn’t ascertain from the website. 

Now that the blue page list widget is gone, type in these words- one per line- and save.

Home
School Members
Classes
Resources
RSS Feeds

Now you should see these pages in a list in your navigation bar, which is probably on your right.
 
2. In your navigation bar, click on “Home”. This will take you to a page that says it does not exist yet.  Click on “Edit Page” and type an introduction of who you are and the purpose of the wiki.  For instance: “Welcome to the XYZ Home school Wiki!   Here’s where we post assignments, logs, links to websites and resources for our school. “ Save your page.

3. In your navigation bar, click on “School Members”. Click on Edit Page and type the names of your children and yourself.  One name per line.    

Highlight the first name in the list and click on “link” in the toolbar.  A box will open that has two tabs on it on the top.  One is for internal links to pages within your wiki- this is called “Wiki Link” and one to “External Links”. External links are for anything outside your wiki- like a You Tube video or a webpage address.   External links should always be opened in a new window.  Link these to internal pages with the same name as your highlighted text.

These personal pages can be used by each individual as a bulletin board where they can organize resources and fun stuff they find on the web. 


4. In your navigation bar, click on “Classes”.  Off of “Classes” make internal Wiki links to pages for each class you have and include information that will identify the specific student, subject and school year.     

For example: 8th grade Art History- son#1- 2010-2011.

 Off of “Classes” make links to assignments, external videos, resources, finished work, etc.  (You could also put these class specific pages under each child’s section under “School Members”.)

5. In your navigation bar, make an internal link for “Resources”.  Off of this page make internal links to general subjects and topics.  For instance: Home school links, Co-op Resources, Stuff I want to read sometime, Curriculum, Inspiration, Technology,  Science, Literature, Math, Projects, Sports, Scouting, Music, Blog and Log, Administration, etc. Off of each of these you can create pages where you link to external websites, videos and  RSS Feeds.

5.  You may want to keep up with certain websites that have RSS feeds. In your navigation bar, make an internal link for “RSS feeds”.  Off of this page use the edit button and click on “Widget” to add a widget.  It will open a link where you can paste the RSS HTML  For the feeds you want to watch.

6.  If your family blogs or your have blogs you want to watch, you can make a page that keeps them all in one place.   I also link to internal logging charts I‘ve made using the “Table” button in the toolbar.  We use these to keep up with reading logs, volunteer service logs and physical fitness logs. (More on those later)

            You can use a wiki to collaborate on projects, reports, papers, or classes.  Just invite other people to join you and start working together.             


            I consider our Wiki to be “fair to middlin” as we say in the south. We use it almost daily and it serves us very well.   No doubt there is a ton more I could be doing with it and as soon as I fold this next basket of laundry I’m going to get right on it.  

            While I’m folding, I encourage you to poke around WikiSpaces for Education and give it a try. (You could also try Wet paint.) You’ll probably find ways to use a wiki that I haven’t even thought of.  If so, leave me a comment and do your civic duty of adding to the collective intelligence.  Let me know how you use your wiki in your home school!


Monday, September 26, 2011

Helping Your Kids Choose Close Friends Wisely


“The righteous choose their friends carefully but the way of the wicked leads them astray.”
Proverbs 12:26

”Do not be misled: Bad company corrupts good character.” 1 Corinthians 15:33

You can’t choose your children’s friends but you can help them choose close friends wisely.  One of the things that my husband and I agreed on early in our marriage was that we would parent deliberately.  We thought about all of the ways people prepare and plan for big tasks in their lives- weddings, SAT’s, medical boards, driver’s licenses- and yet how easy it is to slide into parenting without a game plan.  So, we spend a lot of time talking about how and why we are doing the things we are doing with our children.  Each phase of life requires re-evaluation and preparation.  Time is so short with them and we want to be good stewards of the responsibility He’s given us. 

Friends are one of those areas.  When kids are little it’s easy to arrange playgroups and be aware of the people they interact with, especially other children.  But as they get older, it becomes a little more difficult.  We see in Proverbs and
1st Corinthians that God has plenty to say to us about friends and how we choose them.  These are important concepts to pass on to our children.  First of all, we are told to choose our friends carefully because otherwise we may be led astray.  Next, we are warned against being deceived into thinking we can be around bad company and not be affected.  Teenagers can be especially vulnerable to both of these pitfalls.

This is where we’ve started implementing some strategies that you may want to consider as well.

1.     Pray for close Christian friends for your children.  God has been so faithful to our family in this regard.  My daughter has had three close friends move in the past two years but each one moved in just as the other was moving out.  He provided friendships in His perfect timing.    He listens and knows the desires of your heart. 

2.     Cultivate family relationships.  Friendships are very important and should be encouraged but we always have to keep in mind that our relationships with siblings and parents will last a lifetime.  Many parents in the name of “letting their children grow up” actually let them grow away from the family during the teenage years.  They buy into the myth that kids can only mature outside of their parents. I believe it’s just the opposite.  Now is the time to give them as much freedom as possible while providing as much support and guidance as possible.  

3.     Be the gatekeeper for your children’s heart. You’re the parent.  You can set ground rules about who is allowed to influence them.  This is especially important for older children who are forming worldviews.  Encourage your children to be kind and loving to all but to be very selective when it comes to forming close friendships.  You can help by observing your children’s friends and keeping an open dialog with them about what’s going on with their friendships.  Don’t be deceived into thinking that your child won’t be affected by humanistic worldviews if that’s what they hear all day from the people they are around.   We’ve had to make some difficult decisions to remove our children from certain situations where negative influences were creeping in and it has been one of the best things we’ve ever done for them.

4.     Get involved in their lives and the lives of the kids they like to be with.  Make your house the cool place to be.   The safe place for friends to hang out.  If you are cultivating family relationships your children will likely enjoy spending time with you and sharing your family life with others.   This can also be a great opportunity to be a model and show love to your children’s friends.

5.     Keep communication open so kids will feel free to come to you with questions and concerns. When kids know that you have their best interest in mind, that you will love them no matter what, and that you will speak the truth, they have freedom to view you as their best advisor.  When kids decide that their parents aren’t really that wise, available or interested, they begin to listen to their peers more and get led astray.

6.     Guide them toward places where they will likely encounter friends who will build them up and encourage them to follow Christ.  As iron sharpens iron, so one man sharpens another.   This seems like a no brainer but if your kids aren’t around other Christians it can be hard to grow.  They don’t have to do things exclusively with Christians but the people they spend the most time with are going to influence them the most.  Jesus modeled this for us.  He was very selective about the friends he brought into his inner circle but he was loving to all and spent time investing in friendships with all sorts of people.  He was in the world but not of it.    Christian schools, home school groups, church, para-church organizations and school clubs are good places to find friends for your children’s hearts. 

7.     Have frank discussions about friendships.  What is a friend? What are important qualities in a friend?  How can you be a friend to others?  What kinds of people do you think you should let into your inner circle of folks who influence you?  How can you be a friend to those who believe very differently from you without compromising your faith?  

8.     Import friends.  Find like-minded families and get together.   There are other families out there who are parenting deliberately.  You’re not the only one who is choosing to use these teenage years to grow closer to your children rather than farther apart.  Find these families and cultivate relationships.  Do whatever you need to do to make it easy for your children to develop friendships with children you believe to be good influences. 

Again, you can’t choose your children’s friends for them but you can shape their environment so they have the tools in their box they need to make wise decisions about close friends.   

Wednesday, September 21, 2011

Cozying up with Foxe’s Book of Martyrs

The Christian Martyrs' Last Prayer by Jean-Leon Gerome, 1883


            There are some books that make you want to curl up with a cup of tea and enjoy.  Foxe’s Book of Martyrs is not one of those books.  It makes you squirm.  John Foxe lived in the 1500’s and was a student of church history.  When Bloody Mary, Queen of Scotts came to power in England, she was determined to crush the Protestant church.  Foxe, a protesting Catholic, fled to Europe.  While in exile, he began to compile the stories of Christian martyrs starting with the first martyr, Stephen, and continuing to the years preceding John Wycliffe, the Morning Star of the Reformation.  Upon Mary’s death Foxe returned to England and continued cataloguing the brutal suffering and deaths of the saints under her rule.  This compilation has been revised and added to over the years and is now called “Foxe’s Book of Martyrs”.  Newer versions include martyrs up to the twenty first century.   Page after page recounts the stories of Christians burned, boiled, cut into pieces, flogged, kidnapped, beaten, tortured, starved, imprisoned, exiled, discriminated against, and shot.

            Why would one want to read such a book- or assign it to their 9th grader?  (This was what my 9th grader asked.)  Actually, he is an avid reader and although martyrdom is not his favorite genre he acquiesced.  Let me back up a bit here.  Our school is classical/eclectic, in that I employ lots of different teaching methods but overall I am following the classical model of education.  This model is known for three stages of education: grammar, logic and rhetoric.  A high value is placed on studying original sources as opposed to having textbooks synthesize information and present it to you with the bias of a team of writers. A lot of time is spent teaching how to think rather than what to think.   Now, I definitely use textbooks for some of our subjects but I  also see the importance of going back to these primary documents in order to get the whole picture.  So, this means that instead of telling the kids that there were lots of Christian martyrs and that a man named Foxe wrote a book about them, we will read it.

A martyr is one who “bears witness.”    The modern connotation suggests untimely death as the ultimate price borne by those who wear the title but Foxe also included the emperor Constantine, John Wycliff and Martin Luther although they died naturally. He considered their work and suffering on account of Christ to sufficiently bear witness to his saving power.   Foxe was writing as an eyewitness to many of the horrors he recounted during the turbulent times in which he lived.  

So, again, why read this book?  Well, because it reminds us that often the church thrives when it is persecuted.  And just as importantly, when the church is strong and growing, it often leads to persecution.  Early church leader, Turtullian, said it best, “the blood of the martyrs is the seed of the church.”  This seems counterintuitive.  How could Jesus’ followers be strengthened by their own suffering and destruction?  Because that’s how God said it would be. Christians are commanded to follow in the willing sufferings of Christ. “For even unto this were you called: because Christ also suffered for us, leaving us an example, that you should follow his steps: Who did no sin, neither was guile found in his mouth: Who, when he was reviled, reviled not again; when he suffered, he threatened not; but committed himself to him that judges righteously: Who his own self bore our sins in his own body on the tree, that we, being dead to sins, should live unto righteousness: by whose stripes you were healed” (I Peter 2:21-24).

Jesus sacrificial death was sufficient.  Christians do not have to add to the finished work of Christ. So what is the point of their sharing in His suffering and death on account of the gospel?  It is this.  The blood of the martyrs, sacrificed willingly and with joy, is the most powerful witness to the truth, love and power of Christ this side of heaven.

After reading 400 pages of the testimonies of a host of saints who followed Christ even unto death, it causes me to contemplate a couple of questions.  Am I prepared to stand firm for Christ to the end and joyfully embrace suffering, persecution and even death for the sake of the gospel?  Am I being faithful to pray for the persecuted church of today?  More importantly, if someone accused me of being a follower of Jesus, would there be enough evidence in my life to condemn me?

Friday, September 16, 2011

Technology in the Homeschool: Gettin’ your Tech On


            Technology moves so quickly it’s hard to keep up. Smart phones, Facebook, iPads, Twitter.  Sometimes it’s tempting to get overwhelmed, stick our heads in the sand and declare that we just aren’t going to get with it.  When my son, now 14, was 4 years old we were on the phone with Grammy and she mentioned something about the Grand Canyon to him.  “Do you know what the Grand Canyon is?” she asked him.  “No, but I know where I can find out- www.grandcanyon.com!”  This was in 2001.  I can’t imagine what the average four year old knows now.   The information age has completely leveled the educational playing field as far as knowledge acquisition goes.  If your 10 year old wants to, he can take open college classes from professors at Harvard, Stanford, Yale, MIT and countless others in just about any subject.   

            The Internet was made for lifelong, self-motivated learners, which is what many homeschoolers are.  It has shrunk the world down into a global classroom. Home schools can and should be utilizing technology as much or more than traditional schools. Things are only going to move ahead.  Technology will never regress.  You’re on the information superhighway and there are no exits.  There’s never been a better time to incorporate technology into your classroom. 

How can you do this?  I thought you’d never ask.  I just happen to have 10 ideas.

1.     Buy a keyboarding program or use the free BBC Dancemat Typing online and teach your kids to type correctly as early as possible.   Like in kindergarten.  Almost everything they do (written) for the rest of their lives will be digital.  Sure, they can hunt and peck like you do, and they’ll have to learn to text with two thumbs too, but teaching them to type with all ten fingers will be a great gift. 

2.     Elementary school age children should type, print and turn in compositions at least once every other week.   This gives them practice typing, formatting, using word processing programs and printing.  Middle and High School age children should type all compositions and research papers and should send an electronic copy to you via e-mail or upload it to a school wiki.  (I’ll write another post on school wikis).  You should give certain assignments that have time/date stamp deadlines.  This means that the assignment has to be uploaded to the wiki or in your e-mail inbox by 1200 on September 16th or it’s late and has points taken off.  That’s real life.  It feels funny at first saying “Have you e-mailed me your paper?”  when they are sitting right next to you but it helps keep everyone on schedule.    They should also be cranking out Excel charts and Power Point presentations on a regular basis. 

3.     Assign video reports and other digital media reports.  There are tons of resources for teaching basic film production skills.  Heck, your kids can probably figure this one out all by themselves as well.  We use iMovie, Glogster and Animoto for education. If you’re comfortable, post them to You Tube or their blog. 

4.     Start a school blog.  Thursdays are "Blog and Log" at our house. (More about logging later.) We have a private blog site that is password protected because we’re not ready for them to have an internet presence right now.  They can share the password with friends and family but no one else sees it.  They blog about whatever they want to.  A few times, I’ve assigned topics, but life is exciting.  There’s always something to blog about.  This is the modern equivalent of a creative writing journal.  It doesn’t have to be perfect or profound.  Just write.

5.     Use online quizzing and flash card sites.  I like Quia and Quizlet.   You can make your own flashcards or find ones that others have already made, develop tests, games and quizzes. I recently found  Rosetta Stone Spanish vocabulary flashcards ready made so I didn'thave to reinvent the wheel.  

6.     Take online classes.  We’ve enjoyed Veritas Scholars Academy.  My son’s classmates are from Australia, Tajikistan, Philippines, Florida, Hawaii, Pennsylvania and a fabulous teacher in California.  The kids in these types of classes are all extremely bright, articulate and self motivated.  (You have to be to be taking a Literature class from 9:00 pm-10:30!)  Flat world. 

7.     Set up a school wiki.  We use the free wikispaces for education.  You can establish a private wiki where you can compile text, images, files, movies and more.  Wikis are easy to set up.  There are tutorials on the website. 

8.     Utilize online math tutorials and practice sites.  We really like IXL.  It is a subscription site and I assign extra practice problems that correspond with their regular curriculum.  The site is fun and assures mastery of the concept before they can go further.  They just added Algebra. 

9.     Use online videos and teaching tools like Khan Academy and You Tube (with caution) to reinforce concepts.  We have had hours of entertaining science fun watching vintage Julius Sumner Miller explain physics concepts.  Google him.  He’s a gem. 

10. Use Skype to interview someone.  Everyone has Skype- right?  Arrange an interview with an expert to learn about whatever you are studying right now.


Well, that should keep you busy until my next post.  Welcome to the 21st century.  Get with it. 

Monday, September 12, 2011

Dehydrated and Loving It

          My husband and I did lots of fun stuff during our 5 year honeymoon before kids.  We cooked together and entered county fairs.  M. won first place in Monterey County for his vanilla ice cream and I  picked up an award or two at the San Diego fair.  I was reminiscing about those fun years and remembered that we made beef jerky quite often.  As I rummaged around in my recipe box I found several more recipes we need to try again- Pulled Mints and Fortune Cookies- but no jerky recipe.  Fortuntely, I have Alton Brown on speed dial (he's from Alpharetta, you know.)

           I found a recipe of his online (I was kidding about speed dial.) and HG and I went to work.  It always cracks me up when I read a recipe online and in the comments section people say stuff like, " I don't eat meat so I just substituted celery for this recipe and I don't understand why it turned out horrible."  or "I followed the recipe exactly but I added the following 5 ingredients and left out these 3.  Tastes great."  Well, that's exactly what I did to Alton's recipe.  I am the boss in my kitchen.

           I like Alton, but he has some kooky ideas sometimes- funny hair too.  His recipe called for using air filters and a box fan to dry the meat.  Extra points to him for being inventive, but it's not happening here.  We made the first batch using very lean top sirloin and dried it at 150 degrees in the oven overnight.  Now, we live in Hawaii.  Meat is expensive but electricity is like solid gold. I haven't received this month's bill yet but  I hate to see how much that batch is going to cost me.  So- like any girl who wants to save money, I decided to buy an $80.00 dehydrator.  It was on sale for $60.00 and I got free shipping with Amazon, so I've already saved $20.00! (400+ people liked this one enough to leave positive comments on it.)
        
           HG is an accomplished sous chef and she recommended making a batch and adding teriyaki.  We split the batch and made half regular Alton and half teriyaki.   Sure enough, the teriyaki was hands down the favorite.  This jerky is even better than the honeymoon years recipe!  (If you're going to try it we made a full recipe of Alton's and then used one part Alton's and one part Teriyaki sauce.)

             Did you know that you can make beef jerky out of ground beef?  I didn't until this week.  You add a ton of salt and spices and then use a cookie press to extrude the meat.  It looks wretched but actually tastes very good.  Not as good as Half Alton/Half Teriyaki though.  It was an interesting process so I thought I'd take some pictures to show you how easy it is.  Ours dried in about 6 hours.  We dehydrated apples and applesauce (fruit leather) but we ate it before I could take after pictures.
  
           I feel like Lewis and Clark over here.  Give me a week and I think I could dry enough food to last us the winter.  One of my little fears about homeschooling was that I might become one of "those" counter cultural homeschooler people who like to grind their own wheat, drink unpasturized milk and stuff.  I don't think making jerky counts so I'm doing okay there.  (And hugs to my homeschooling friends who do all of the above!)